When working on a project, individually or collaboratively, you may encounter the following scenarios:
- If you add a new feature to your project, you run the risk of accidentally breaking your working code as you test the feature. This would cause unexpected issues for active users of your project, even if the only active user is you.
- When you collaborate with others, and everyone works on the main branch simultaneously, there could be a lot of confusion and conflicting changes.
- Some code/feature might not be interesting for everyone. There may need to be a way to allow new work to be done on a project whilst protecting work that has already been done.
Git branches are extremely valuable when addressing any of these issues. For every Git project, by default, you have one branch called ‘main’ where all commits are recorded. The branching feature of Git allows us to create a copy of a project that we can work on and continue to make commits to without integrating them into the main branch right away. Meanwhile, one can continue to make commits on the main branch, which is untouched by the changes made on other branches. Once you are happy with whatever you were working on on a branch, you can merge it into your main branch (or indeed any other branch). Merging will be covered in the Merging Branches in Git subchapter.
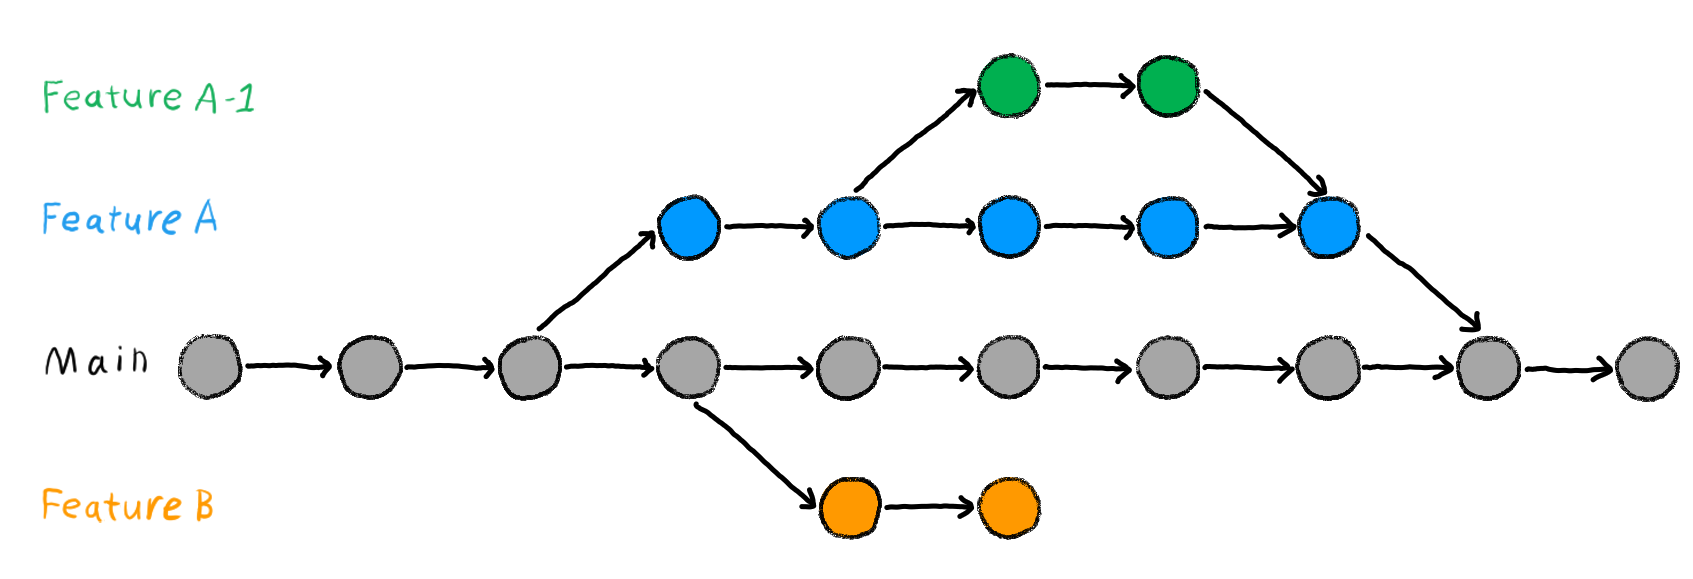
If you test a feature on a branch that does not work out, you can delete or abandon it (for example, Feature B in the diagram below) rather than spending time unpicking your changes if you were doing all your work on the main branch. You can have as many branches off of branches as you desire (for example, Feature A-1).
Using branches keeps working code safe, particularly in collaborations. Each contributor can have their own branch or branches which are only merged into the main project when they are ready.

Figure 1:An illustration of branching in Git
You can create a branch and switch to it using:
git checkout -b name_of_your_new_branchTo change between branches, use the following command:
git checkout name_of_the_branchYou must commit any work you have in progress before you can to switch to another branch.
You can see all branches of your project using:
git branchThis gives the output as a list with an asterisk next to the branch you are on.
You can also use git status if you have forgotten which branch you are on.
If you decide to get rid of a branch you can delete it with:
git branch -D name_of_the_branchGood practice
Branches should be used to keep the main branch clean. That is, the main should only contain work which is complete, tested, and rightfully belongs in the main version of the project. Similarly, you should try to keep individual branches as clean as possible by only adding one new feature per branch. This is because if you are working on several features, some may be finished and ready to merge into main while others are still under development. Keeping your branches clean means only making changes related to the feature on the feature’s branch. Give your branches sensible names, “new_feature” is all well and good until you start developing a newer feature on another branch.
Interactive tutorial
Learn Git Branching is a project to provide an interactive way to learn Git. Going through their tutorials will provide substantial experience with the most commonly used git commands and branch manipulation techniques.