Here, we provide step-by-step instructions to get started with GitHub.
1. Create a GitHub account
Go to https://github.com/ and create a new account using the sign up to GitHub box.
2. Create a repository
When you have created a new account and you are logged in, you need to create a new repository.
A repository or repo is the online space where you store all of the documents, data and other files for your project.
- To create the new repository, you need to click on the + sign in the top right corner (in the black band at the top of your window) and then click New repository. This will take you to a page that looks like a form.
- You will see the name of your account and you need to fill in a repository name next to it.
- Also, leave the box ticked for “public” (so your repository is open to all) and then tick the box to create a “README file”.
- Then click the green create repository button at the bottom.
This is what you should see now. It is the landing page for your repository. The diagram below explains what all the buttons, tabs and other things do!
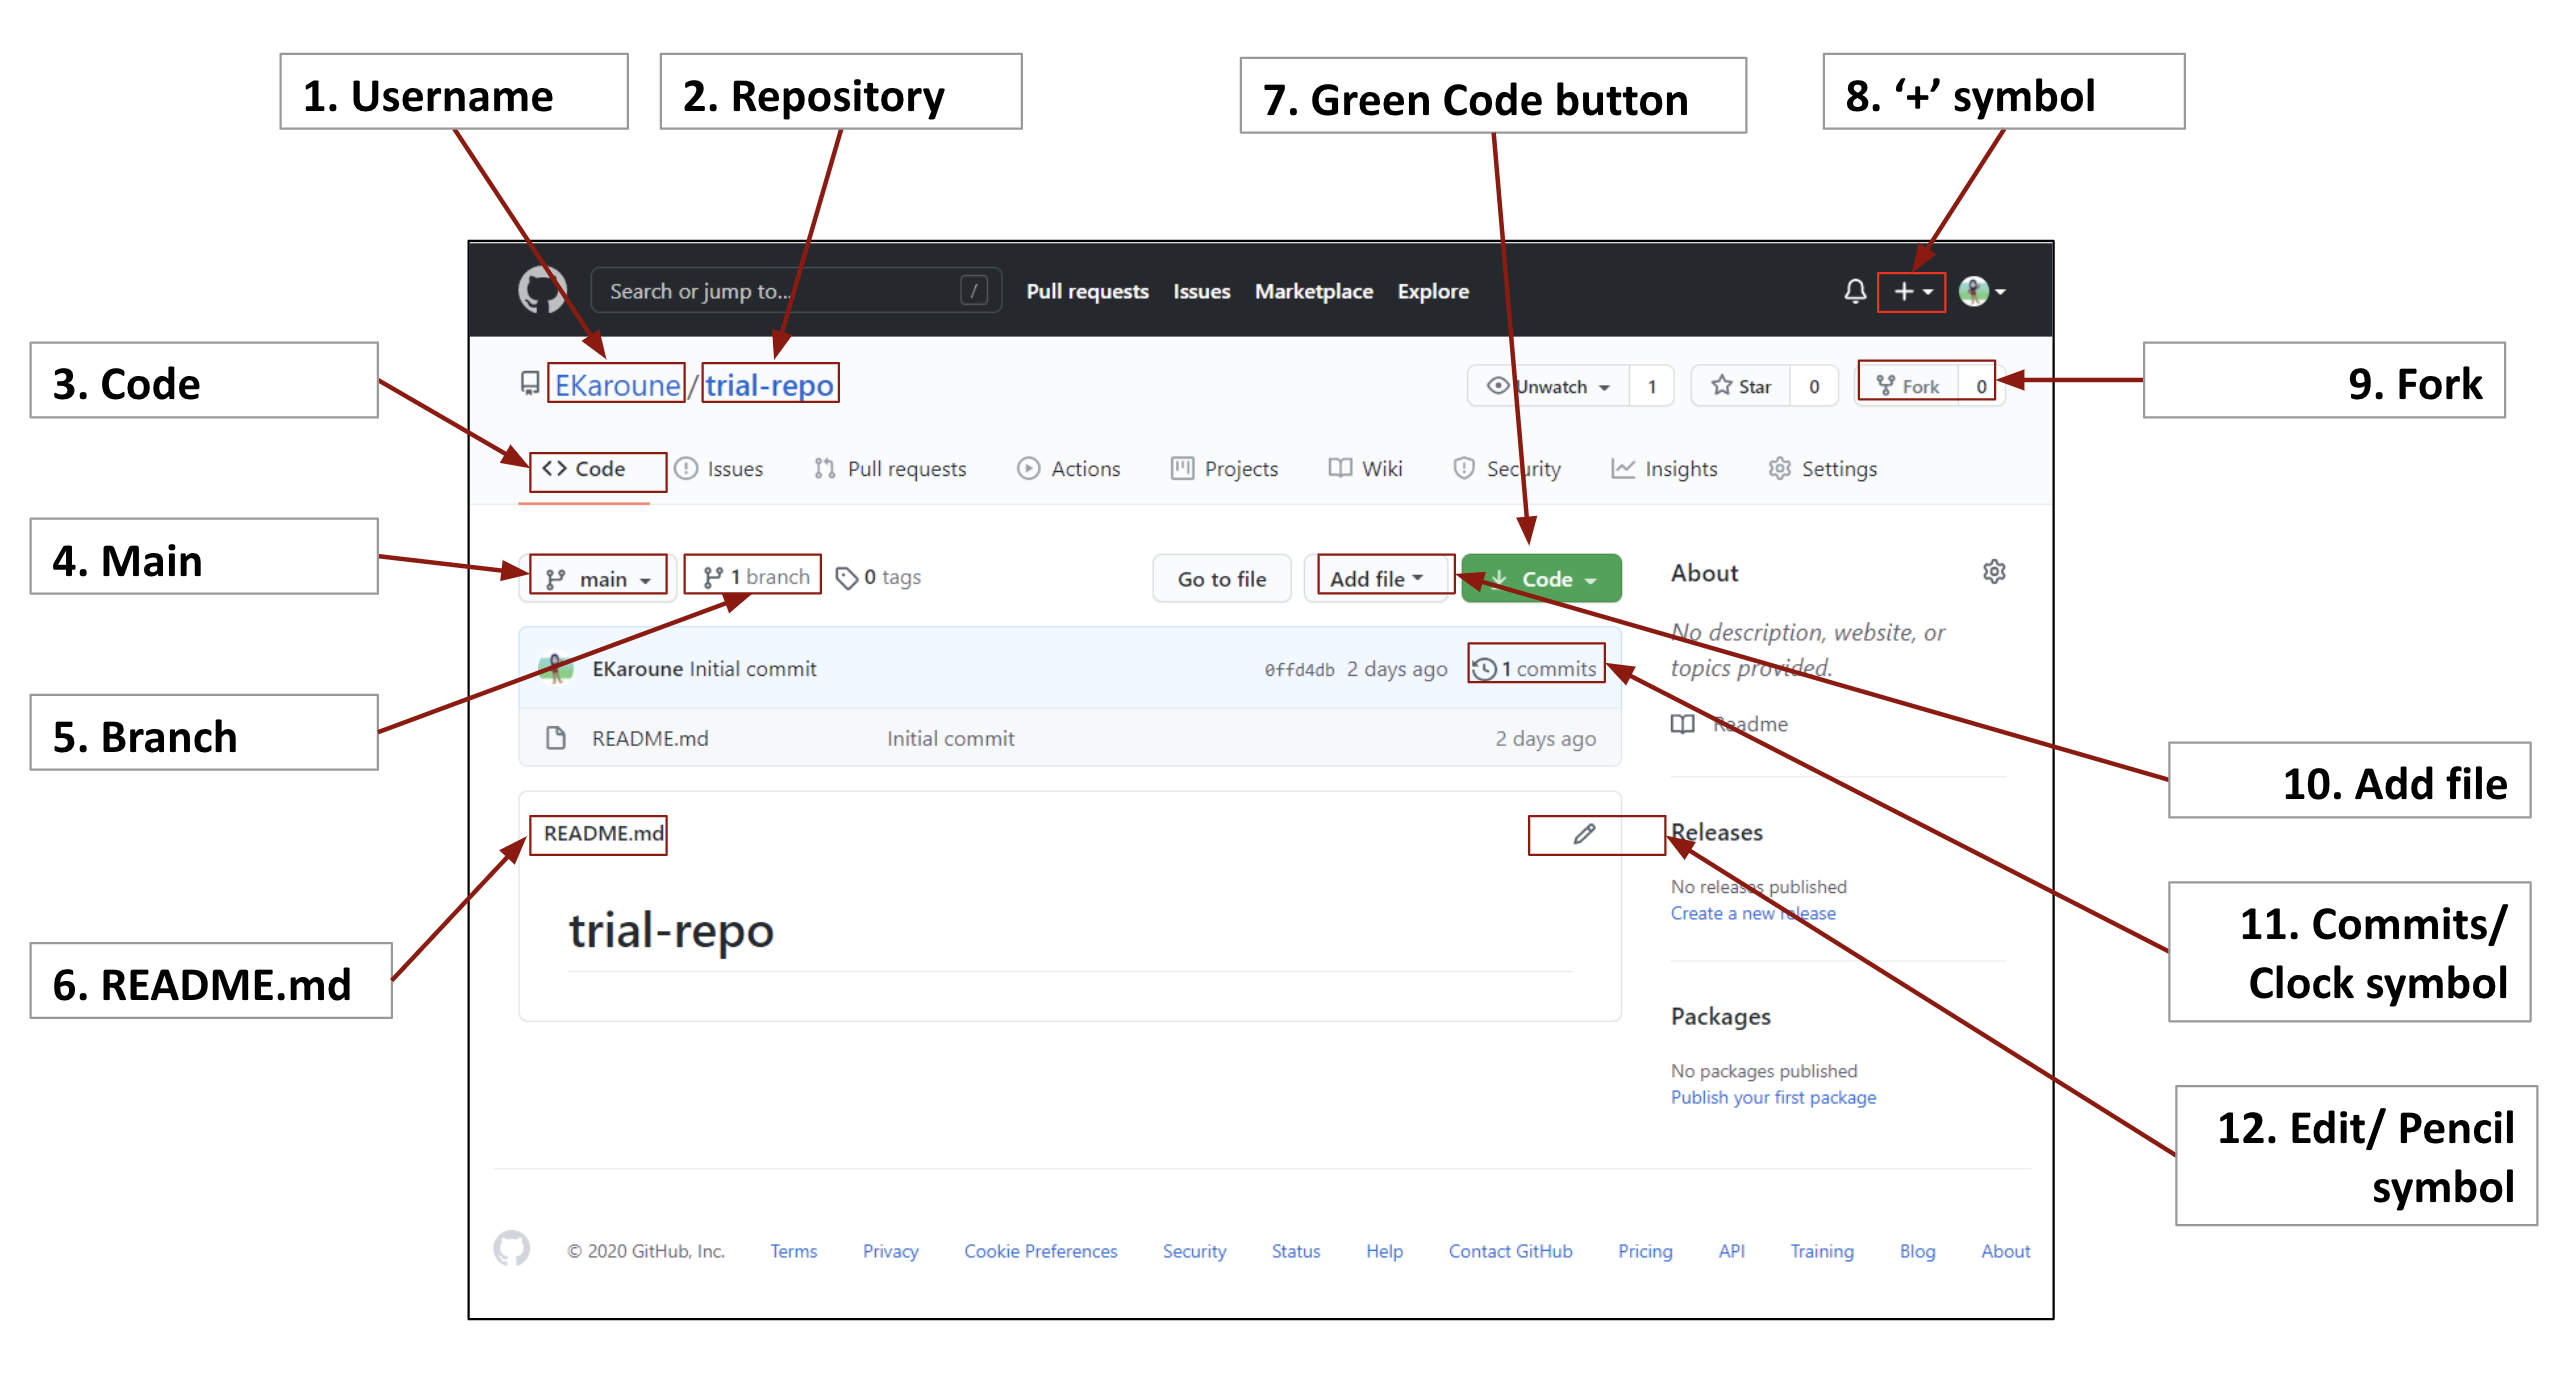
Figure 1:Annotated diagram of repository after its basic creation, explaining the main features. On the left side of the webpage we have the following features:
- 1. Username: GitHub user’s name (account). In this example, the username is “EKaroune”.
- 2. Repository: project directory (also known as repo). In this example, the repository name is “trial-repo”.
- 3. Code: this tab brings you back to your landing page. It shows you the folders that you have made in the repo.
- 4. Main: this is your default development branch or active branch of your repository.
- 5. Branch: parallel version(s) of your repository.
- 6.
README.mdfile: this file contains basic information about your project (in this case it only has the project name: “trial-repo”. When we plan to make a website, this will be rendered as a landing (front) page for your site.
On the right side of the webpage we have the following features:
- 7. Green Code button: click it to download your repository locally.
- 8. ‘+’ symbol: where you can create new repository, import repos and create new issues.
- 9. Fork: create a personal copy of another user’s repo. The number shows how many forks there are of your current repository.
- 10: Add file: create or upload a file to your repository.
- 11: Commits/clock symbol: click to see the history of this file as a list of all the edits (commits) saved at different time points.
- 12: Edit/Pencil symbol: click this pencil symbol to edit your README.md file.
3. Edit your README.md file
Unless you have added any other files or included a license file during repo creation, you should have one file in your repository now - README.md. We’ll need to edit this file to add information about the repo. This file is a Markdown file; you can see this because it has “.md” after the name of the file. This is where you start to use the Markdown formatting. Whatever you write in this file will be shown on the landing (front) page of your project on GitHub, so use it to tell people all about your project.
Navigating the GitHub editing interface
To edit your README.md file:
- You can click on the pencil symbol in the top right of the central box on your landing page.
Or
- Click on the
README.mdfile and then click the pencil symbol.
You can now edit the file. We’ll talk about how to save your changes after some pointers on writing a good README.
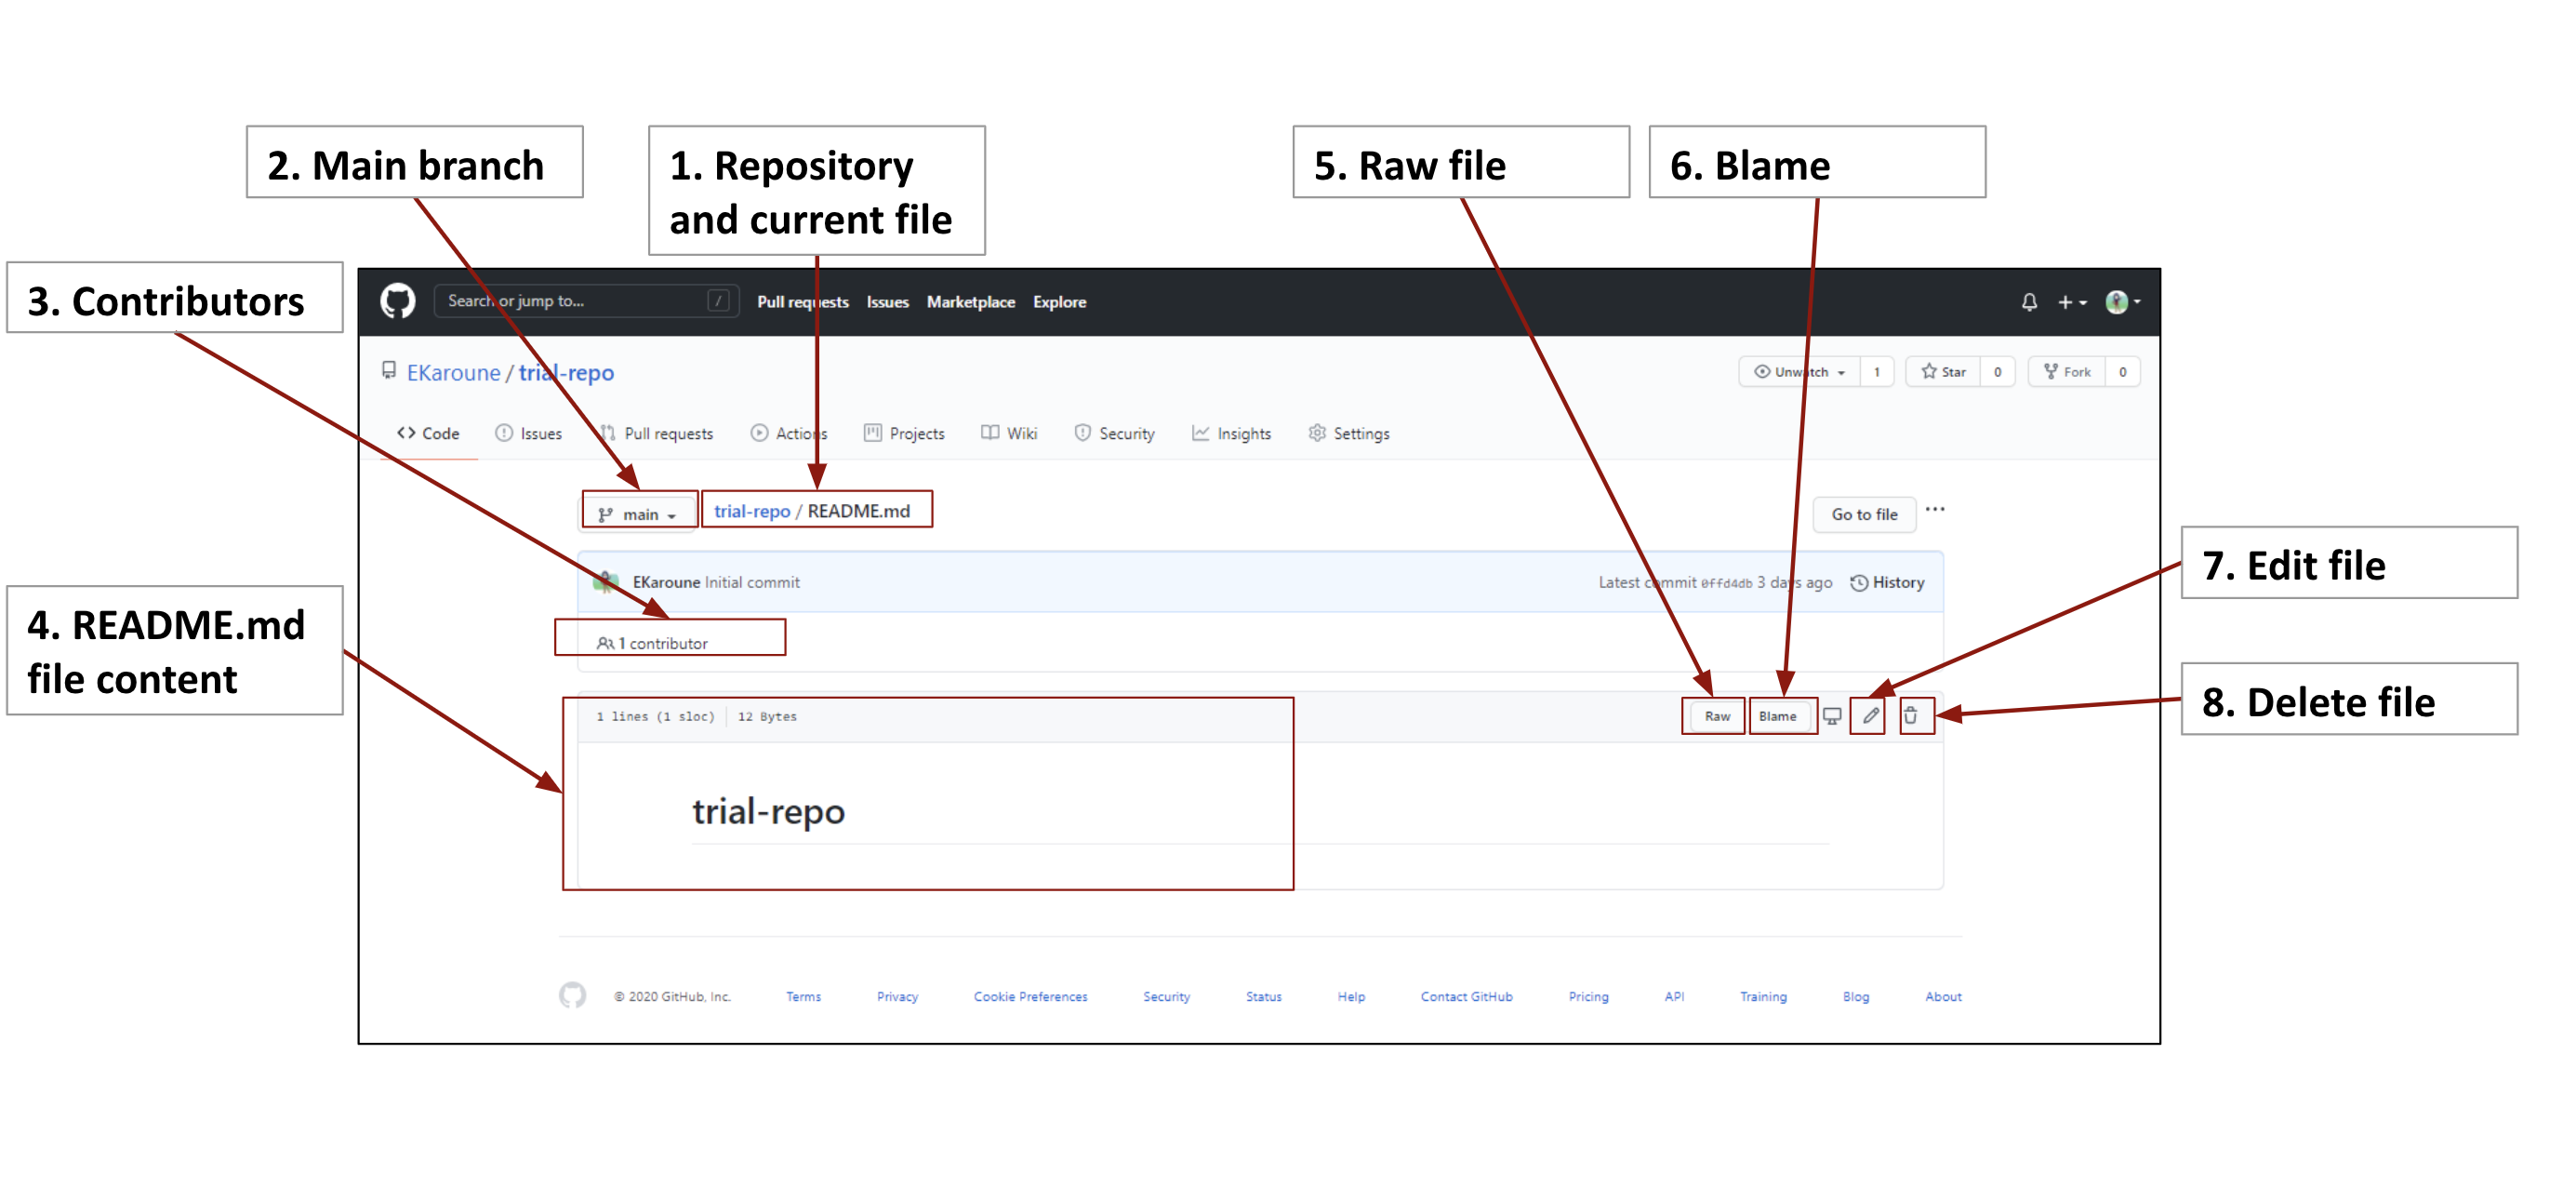
Figure 2:Annotated diagram of README.md file, if you click on the file name on your landing page.
- 1. Repository and current file: the repo name and the name of the file you are viewing.
- 2. Main branch: currently active branch (“main” is the default). Use to change to different branches of your repo (if there are more branches previously created).
- 3. Contributors: number of contributors (users) to your file.
- 4. README.md file content: the content of your README.md file appears here. This content will expand once we add more information..
- 5. Raw file: view the raw markdown text file.
- 6. Blame: view the last modification made to each line of the file. It can be used to track when and who made changes and go back to older versions of the file to fix bugs.
- 7. Edit file: click this pencil to edit your README.md file.
- 8. Delete file: click the bin to delete this file.
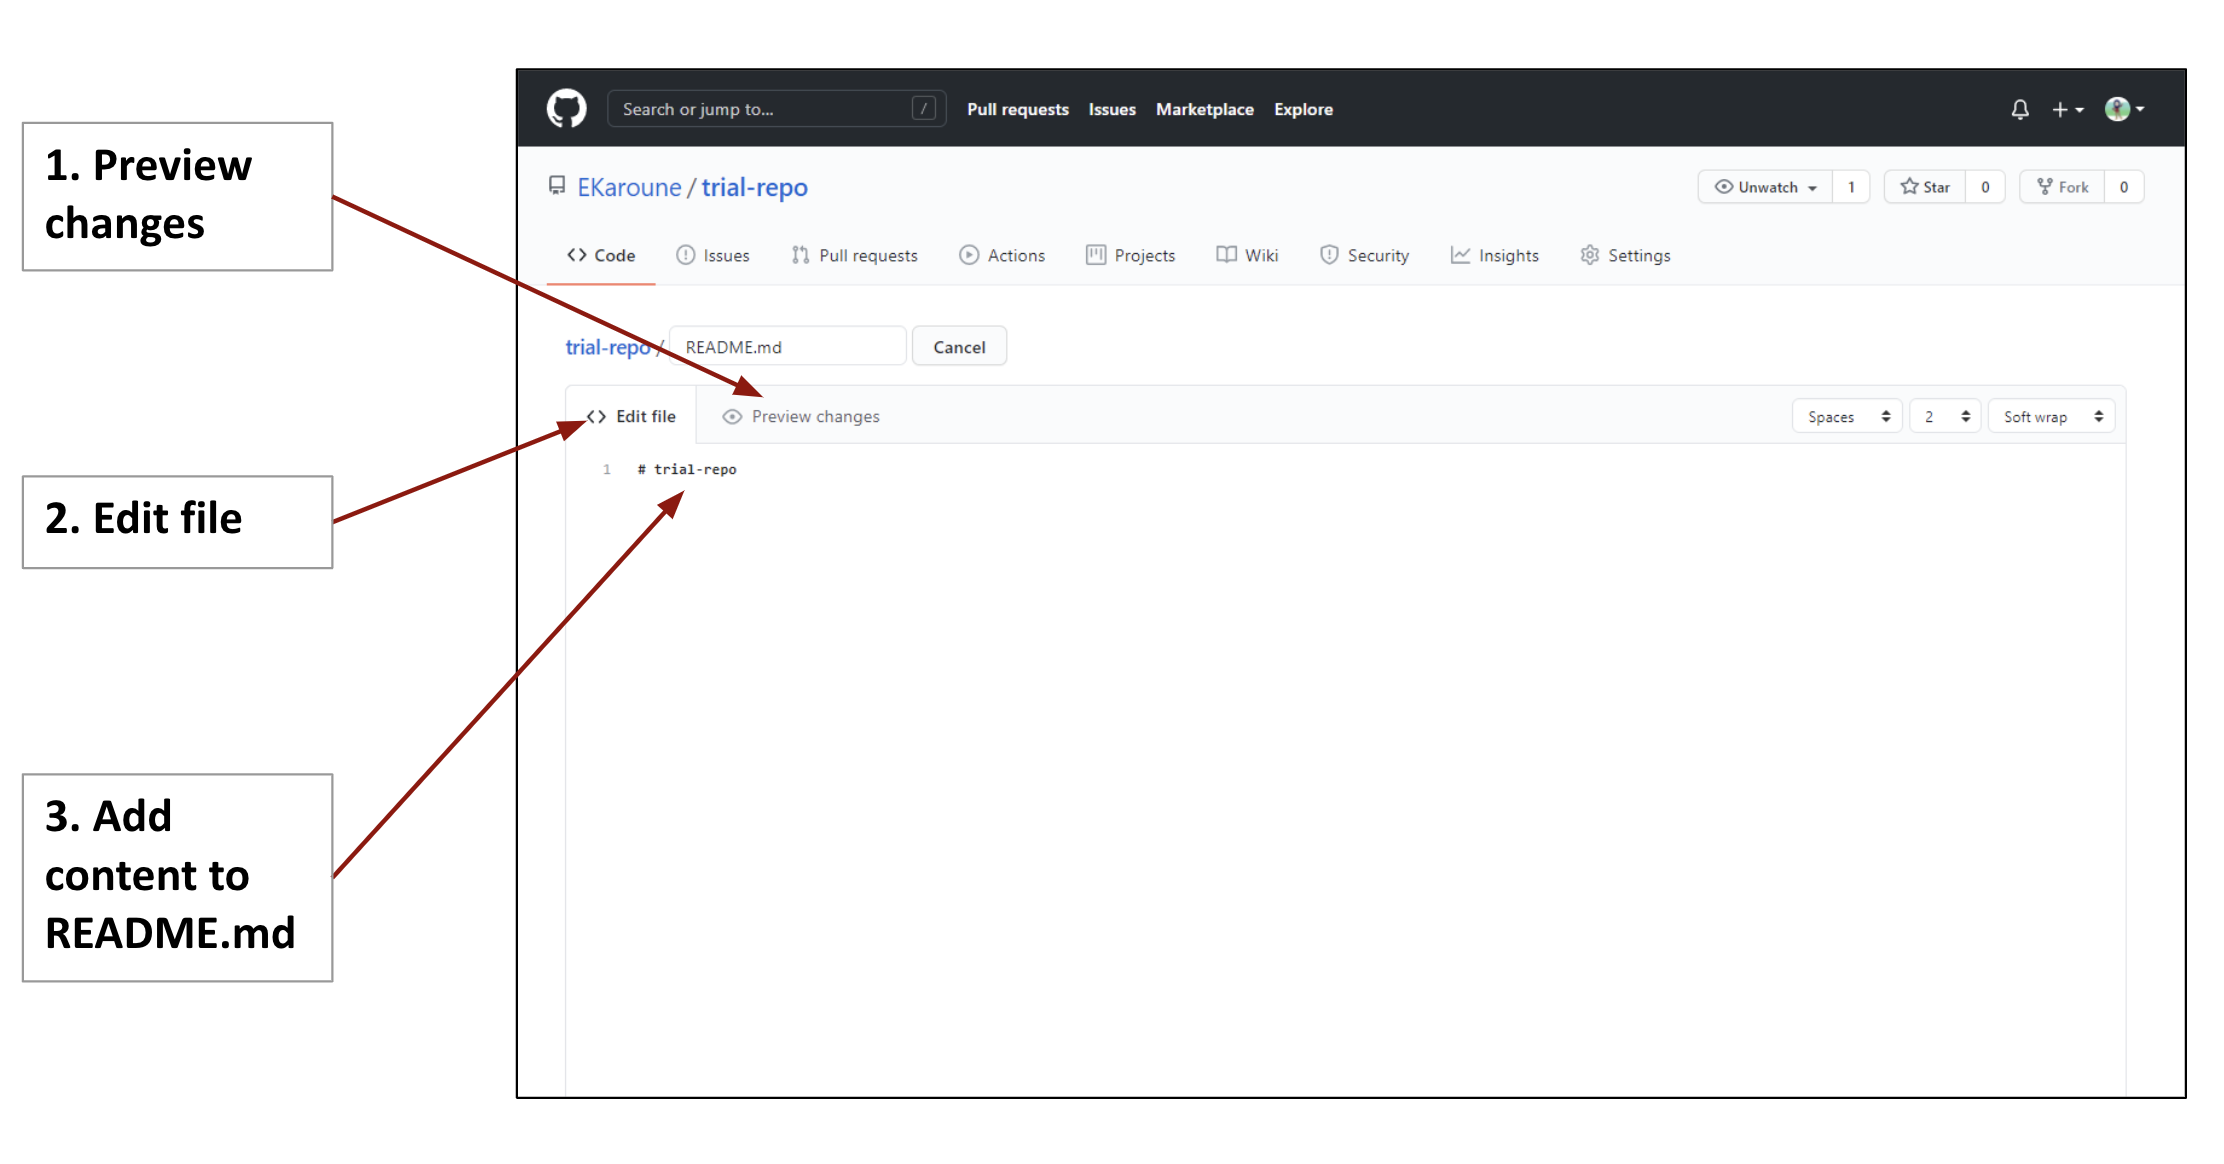
Figure 3:Annotated diagram of README.md file in edit mode – before editing.
- 1. Preview changes: press to see your text rendered (how it would appear on GitHub or on a web page).
- 2. Edit file: press this tab to edit the content of your README.md file.
- 3. Add content to README.md: write the Markdown text for your README.md file. You currently only have the repository title in this file.
Tips for writing your README file
- Keep it simple! When you’re working in any field, whether it’s software engineering or astrophysics, you’ll learn and use jargon – terms that have a special meaning to your field but likely won’t make sense to anyone who isn’t part of that field. Too much jargon can confuse newcomers, so use simple language and define all potentially unfamiliar terms here.
- Share your project with others - describe what you are doing now and what you want to do in the future.
- Tell people who you are and how you can be contacted.
NOTE: If you’re having trouble getting started, it’s a good idea to look at other peoples’ README.md files.
If you can’t get your raw markdown content to render in the way you want, it is also a good idea to find a file that has what you want and then look at the raw file.
You can copy and paste other people’s raw file content into your README.md file and then edit it.
Here is an example of a really well formatted README.md file: STEMM Role Models App
If you click the link above, it will take you to their README file. You can use this as a template for your README.md file.
- To look at the raw markdown file you need to click on the raw button (top right of the white box).
- This takes you to the markdown raw file that is rendered into a nicely formatted
README.mdfile on GitHub. - Now just copy and paste it into your
README.mdedit tab. You can now edit this for your project. - Remember to check what it looks like by clicking on the preview changes tab.
- When you have finished editing, you need to scroll down to the bottom of the page and press the green commit changes button.
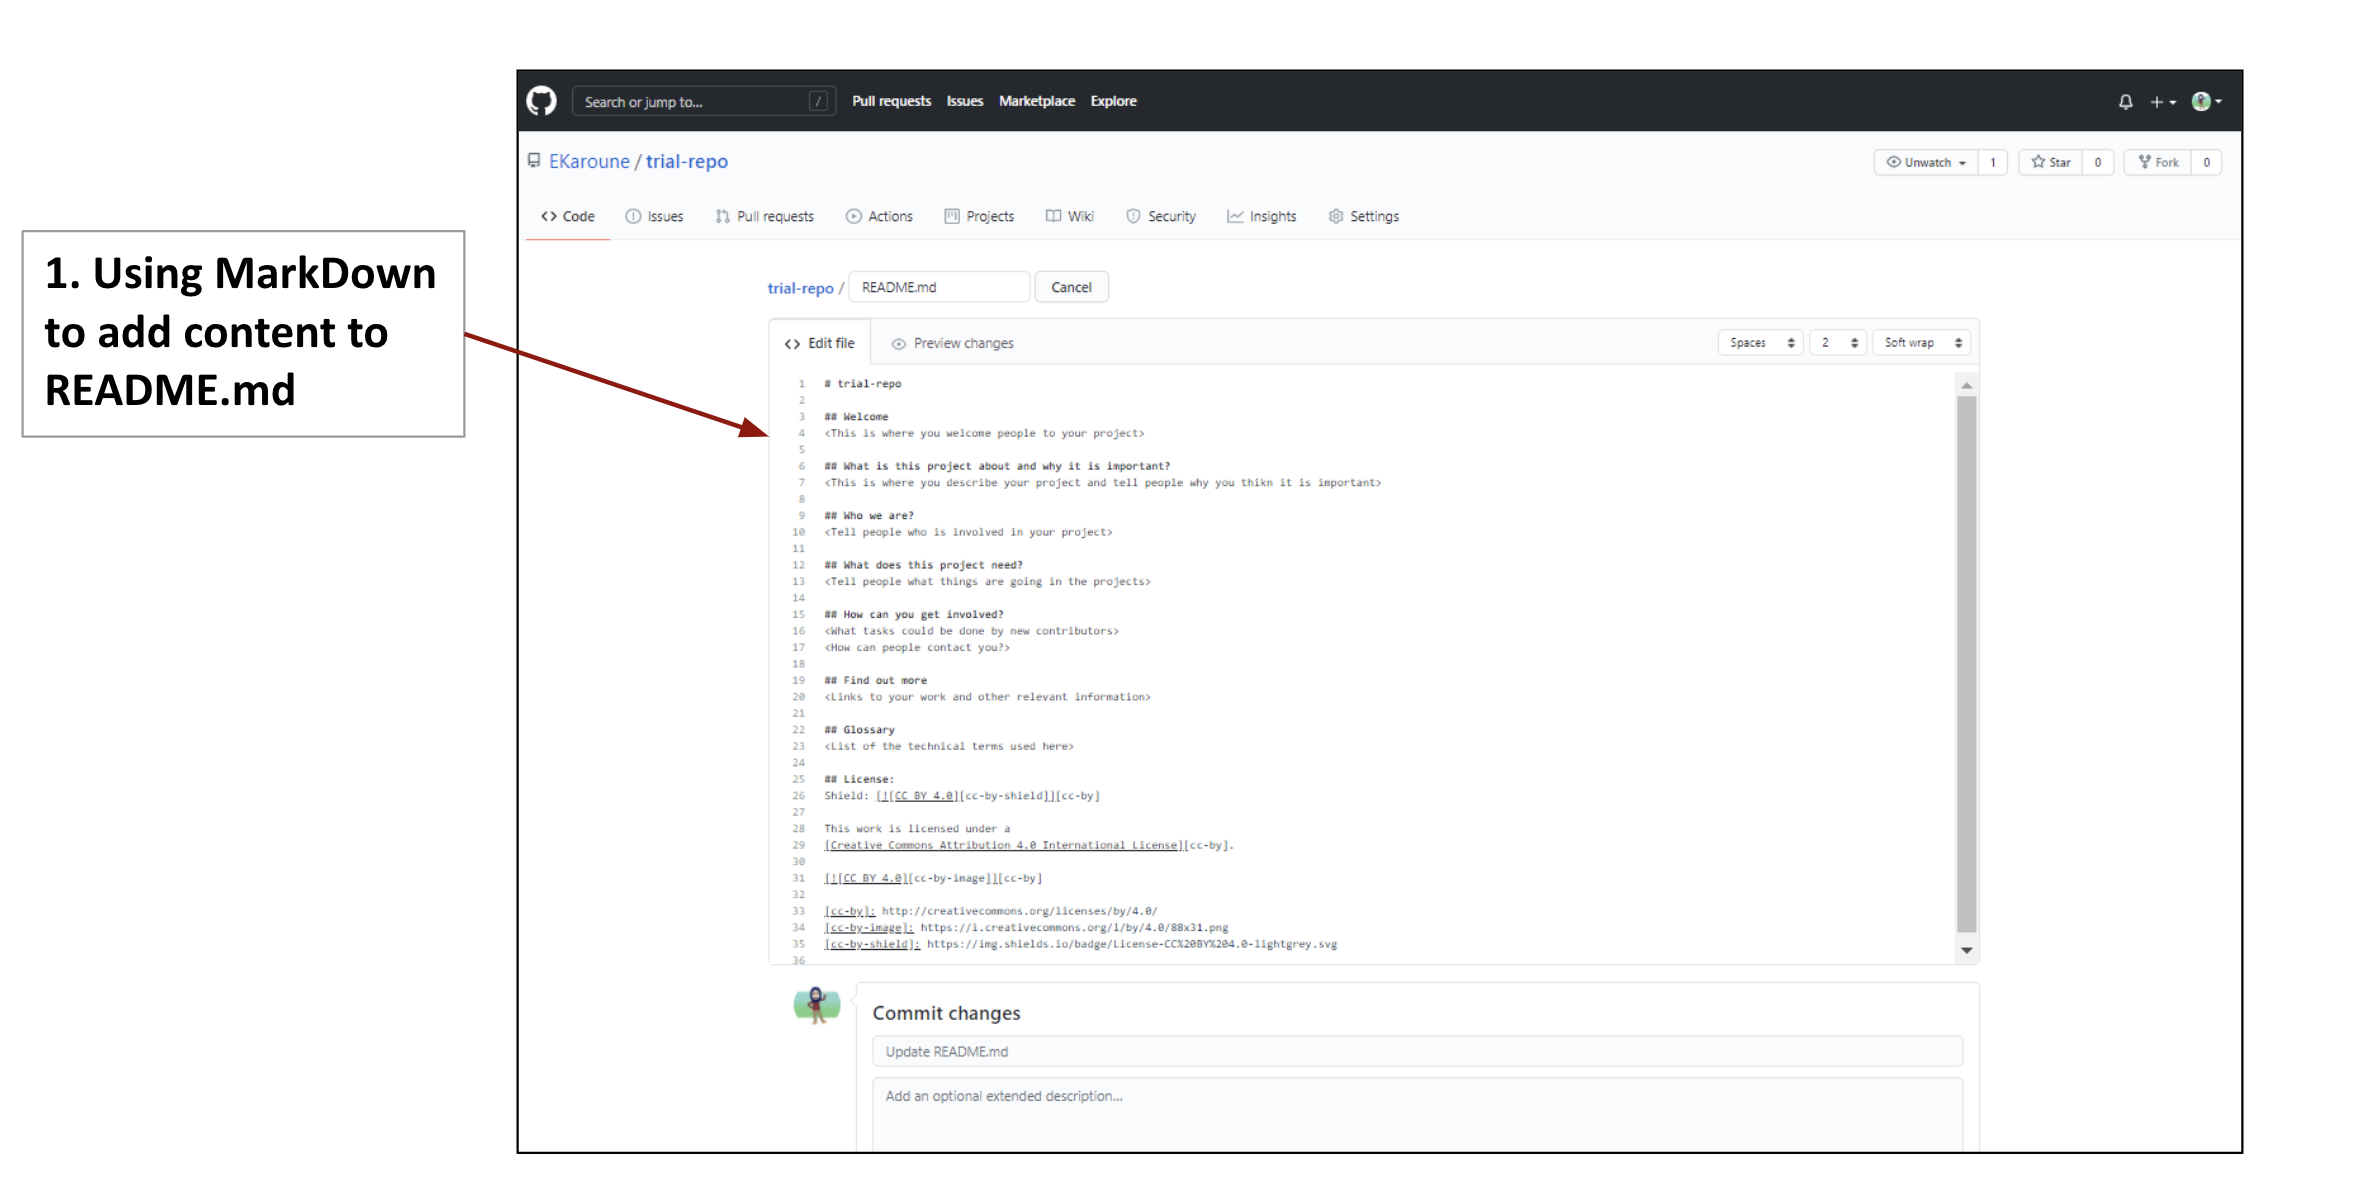
Figure 4:Annotated diagram of README.md file in edit mode – with a template added.
- 1. Using MarkDown to add content to README.md: the Markdown (denoted by ‘.md’ in the file extension) text for your README.md file. This example shows the template file that has different sections (headers and subheaders are created by using one or more of ‘#’ symbol. See the formatting consistency section of the Community Handbook for some more information on using Markdown.
Committing - or saving - your changes
Committing your changes is like hitting the “save button” for a file. GitHub will not automatically save your changes, so it’s important not to skip this step.
Whatever changes you have made in the file will be deposited into your repository.
It is good practice to write a descriptive commit title and a short description of what you have done in the commit changes box. So something like - commit title: ‘first edit of the readme file’; description: 'copied template from … and edited it with the details of this project’. This information about the commit is called a “commit message”, and the commit title will enable you to quickly look through the history of changes for a file (which is why making them descriptive is so important - it’s like leaving a helpful note to your future self).
You can see a list of your commits (or your “commit history”) by clicking the clock symbol on your landing page or within the page for each file.
4. Add a license to your repository
It is important that all of your work has a license from the very beginning or no one can reuse it. Licenses tell other researchers how they are able to reuse, modify and remix your work. No license implies that others are not allowed to use your work, even with attribution. So it is better to include a license that lets people know what they can and can’t do and how to give you credit for your work.
Depending on your field, much of your work may be documents with only some data or code. The standard licenses offered on GitHub are most appropriate for software and won’t really be the right kind for documents.
Creative commons licenses are the best to use for this purpose, and the most open of these is the CC BY 4.0.
To add a license to your repository, the first thing to do is create a LICENSE.md file:
- To do this, click on the Add file button, and click create file. This will give you a blank file.
- Then, you need to name the file, so call it
LICENSE.md. This makes it into a markdown file. - You can find all the creative commons licenses in the link above so copy the text of the license you want and then paste it into this file.
- Don’t forget to press the green commit new file button at the bottom and write a commit message to describe what you have done.
- You can also add a link to the license to the bottom of your
README.mdfile. Here is a link to a repository that you can copy to add in a CC BY 4.0 license. It has a text file for yourLICENSE.mdfile and also a shield (or badge) that you can put at the bottom of yourREADME.mdfile.
You can find more information about licenses in the Licensing chapter of The Turing Way.